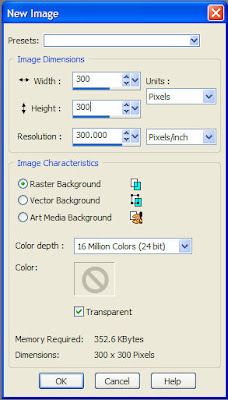
1. Open a new workspace about 300x300 with the TRANSPARENT box clicked.
2. Click your TEXT tool which is usually on the left side of the workspace and presented by an A.

3. Click on your TEXT tool and then in the text entry box, enter your watermark text, Leave the box open;
4. Okay, now we need to set some details about our text,
a. while the text box is still open you need to set the color to black, make sure the text is highlighted

b. In the settings bar or presets for the text tool, which is usually at the top of the workspace and looks like this:
 make sure the settings outlined in red are set to the same as above.
5. Now on your layer pallet to the right of the workspace you will see your LAYER pallet that looks like this:
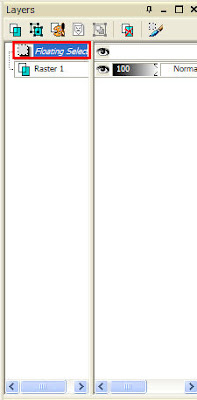 See that you have two layers, we are going to erase the layer that is highlighted and says FLOATING SELECTION, by right-clicking the floating layer and deleting.
6. After you delete the FLOATING SELECTION, your text will look like this:
 7. Now while your text still has the marching ants (lines which move to outline your text) find the EFFECTS menu at the top of the screen,
 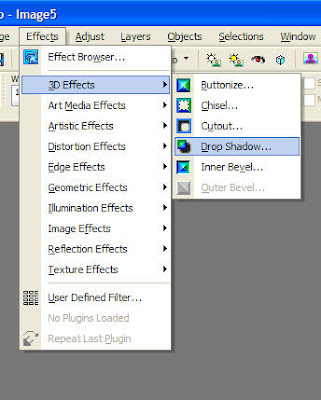 CLICK it and go down to 3D EFFECTS, the menu should go out to the right, select DROP SHADOW.
8. Okay now for the settings:
vertical: -1
Horizontal: -1
Opacity: 90
Blur: 90
Color: black
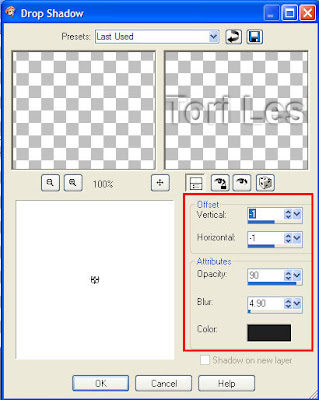
***You can expirent with these settling to see how results you can acheive but for this watermark set them as above.
9. CLICK OK and now you have something that looks sorta like this, but with your text. ;0)
 10. Now we are going to make a TUBE out of out watermark so we can just stamp it where it needs to go and never have to redo all these steps.
11. Your TUBE tool is on the left side of the work area (by factory settings) and looks like this:

A tube is basically a preset picture that you can use like a stamp almost, one of my favorite tools!
12. Go back to your water mark and we're going to crop it. Select your CROP and crop to smallest possible size.

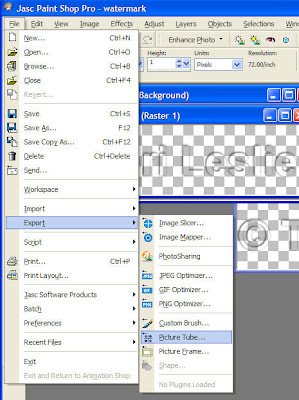
13. Now go to FILE at the top of the workspace and go down to EXPORT then down to PICTURE TUBE.
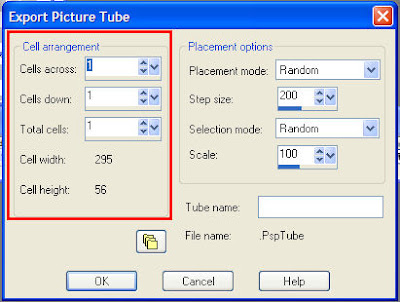
14.We are going to set some details here. We are onlly going to change the CELL ARRANGMENT now. Change each box to 1.
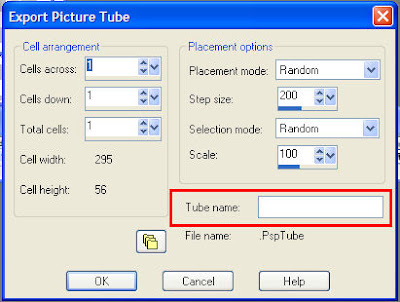
15. Now set the TUBE NAME to WATERMARK. Hit OK and you have now made your first Tube.
 16. Okay now that that is finished you can open any photo and try your new tube. Simple click on the TUBE tool on the left side of the workspace.
17. In the TUBE presets at the top of the screen you need to select the tube type but clicking on the tube selector, and then the size can be changed as well.


18. Now simple click where you want your tube to go on your photo. Remember you can resize it quite a bit to your liken.

19. Ohh and Ahh over my super sweet neices, Madison and Kaitlyn Wise!
20. Bravo, you're finished!!
If you have any problems with this tutorial, feel free to e-mail me.


19 was the easiest of steps~ what dolls~ I use photoshop.. but I wish I would have known all this when I had psp~
ReplyDeleteWow Tori, I'm always so amazed at how computer-savvy you are. (o:
ReplyDeleteLOL! I'm confused already. I do better when someone shows me. If I ever want to do this, I'll have my cousin help me. Love the photo.
ReplyDeleteYour nieces are just precious!
ReplyDeleteThanks for all the detailed instructions. I'll have to remember your tutorial if I decide to give this a try. :)
I really appreciate your posting this tutorial! I used it to create a watermark for my photos. :)
ReplyDelete