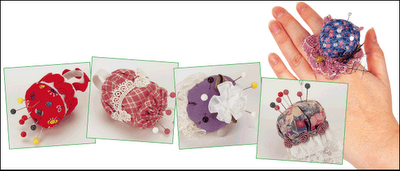
I love this project! What a great way to recycle and make something useful! Don't throw away those scraps of fabric, lace and ribbon! A sewer and crafter can always find a way to use the tiniest of scraps. There are plenty of examples of this design, but have fun creating your own unique looks!
Materials
Scraps of fabric
Scraps of elastic
Scraps of batting or fiberfill
Plastic bottle cap
Needle and thread
Fabric glue
Notions: charms, ribbons, rickrack, other trims
Instructions
Cut 3- to 4-inch circles of fabric. Sew a gathering stitch around the edge of the fabric. Gently pull in gathers until there is a small opening. Stuff loosely with scraps of batting or fiberfill. Pull gathers tight and knot securely.
Pour a puddle of glue into a clean plastic bottle cap. Insert the raw end of the gathered ball into the opening and firmly hold in place. Allow to dry. Check to make sure ball is secure before continuing.
Now the fun starts! You can glue lace or other trimmings around the outside of the bottle cap. You can sew a few charms to the ball. Glue a ribbon rose or yo-yo or button to the top of the ball. Get creative!
Measure the elastic around your finger allowing for about 1/2 inch of overlap. You don't want the elastic tight around your finger; you want it to just fit. Sew overlap or glue with fabric glue.
Turn bottle cap over to bottom. Roughen the plastic bottom by scratching with a pin or craft knife. Glue elastic ring to roughened area of the bottle-cap bottom.


Oh this is just too cute a project!!! I love it! Thanks for sharing this! It is one I will have to try :-)
ReplyDeleteooh, another project. How fun!
ReplyDeleteThank you for sharing these. You seem to be my resource for great craft ideas. *Ü* Thank you!
I also wanted to let you know that I am praying for you. I seem to fall into the pit of unmotivation, too. But it will pass. Keep doing what you're doing (reading God's Word, meditating on it, praying, memorizing, singing *Ü*) Keep pressing on.
Praying for you ~
Christina
HsKubes HomeSchool Haven
HsKubes Haven for Home
Christian Military HomeSchool Mamas
I thought this was a really cute craft also.
ReplyDeleteThanks Christina for the encouragement. :0)
Neat idea!! How come I don't think of things like this? I know why....I'm not creative enough to think of it. Thanks for this idea and the instructions to make them.
ReplyDeleteGreat stuff you have here,thanks for sharing! My sister in law just came back from 3 weeks in Croatia! Great resources!
ReplyDelete~cheers & blessings~
Angie
Adorable!! Thank you so much for sharing it!
ReplyDeleteAww.. how cute. Thanks for sharing. My list of to do's is growing and growing. lol
ReplyDelete